
-
*How to* Site-To-Site VPN Tunnel ASA IOS 8.4 & 8.2
Posted on September 8, 2012 by Michael in Latest News, Tutorials
Having previously covered site to site VPN’s for a PIX to ASA, with the release of IOS 8.4 the config you use to configure VPN’s has changed a little, so this how to guide shows you how to create a site to site VPN tunnel between the new IOS 8.4 and an older IOS version 8.2
In the network diagram above you can see the setup we will be using, I’ve got two ASA’s with an 1841 “simulating” the public internet.
To clarify:
- Site A = MRASA01
- IOS Version = 8.4
- Internal LAN: 192.168.10.0/24
- External WAN: 81.171.171.26/30
- Site B = MRASA02
- IOS Version = 8.2
- Internal LAN: 10.10.10.0/24
- External WAN: 91.45.23.34/30
I’m not going to go through configuration of the ASA’s and the 1841 (the base config) But for reference here is the base config for both ASA’s:
Basic Config on MRASA01 running IOS 8.4 (4)1
- MRASA01# show run
- ASA Version 8.4(4)1
- hostname MRASA01
- interface Ethernet0/0
- switchport access vlan 20
- interface Ethernet0/1
- switchport access vlan 10
- interface Vlan10
- description INSIDE_LAN
- nameif inside
- security-level 100
- ip address 192.168.10.254 255.255.255.0
- interface Vlan20
- description OUTSIDE_WAN
- nameif outside
- security-level 0
- ip address 81.171.171.26 255.255.255.252
- route outside 0.0.0.0 0.0.0.0 81.171.171.25 1
And on MRASA02 running IOS 8.2 (1)
MRASA02# show run
- ASA Version 8.2(1)
- hostname MRASA02
- interface Vlan10
- description INSIDE_LAN
- nameif inside
- security-level 100
- ip address 10.10.10.254 255.255.255.0
- interface Vlan20
- description OUTSIDE_WAN
- nameif outside
- security-level 0
- ip address 91.45.23.34 255.255.255.252
- interface Ethernet0/0
- switchport access vlan 20
- interface Ethernet0/1
- switchport access vlan 10
- route outside 0.0.0.0 0.0.0.0 91.45.23.33 1
Now we’ve got both the ASA’s configured (Site A and Site B), we now need to configure the VPN tunnel to connect the sites.
I’m going to in this example show you how to configure the VPN tunnel using 8.4 first, and then proceed to configure Site B (which is using IOS 8.2).
There are many ways to setup a VPN tunnel; the method I prefer to use follows these five steps:
1) Enable ISAKMP.
2) Create ISAKMP policy.
3) Set the tunnel type.
4) Define the IPSec policy.
5) Configure the crypto map.Step 1 is fairly straight forward; we are enabling ISAKMP on the interface, and we will then create the ISAKMP policy. When creating the policies, the lower the priority number the higher the priority, it’s worth keeping that in mind.
Let’s firstly enable ISAKMP on the outside interface and then create our first policy.

Fairly easy enough, now let’s create the policy you will see I’m using DES as the encryption method and sha for hash.
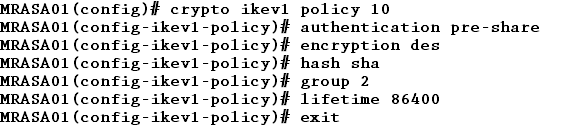
(obviously real world you would choose to use a stronger encryption (aes-256) for example).
We now need to set and define the tunnel group and group-policy. This defines the site to site tunnel and is used to map the attributes that are assigned to a specific IPSec peer.
As we are using a pre-shared key method of authentication, then we configure this under the tunnel group as well.
First we create the group policy which referes to the previously configured ikev1 policy.
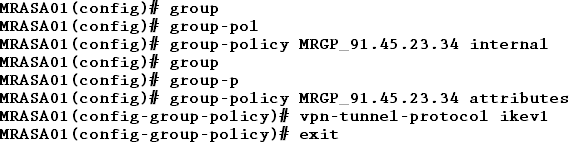
Now we create a tunnel group referencing the remote peer and group policy we created above

Now let’s assign a key to that tunnel group.

We now have to define the IPSec policy, this is where we specify what type of encryption and hashing to use for the data packets once a secure connection has been established.

Now phase 1 and phase 2 are complete, we need a crypto map in place. A crypto map is complete when it has the following three entries:
- At least one transform set (which we have created called Michael)
- At least one VPN peer
- An encryption ACL
First I’m going to create the ACL, we should all be fairly familiar with these by now:

Next up the crypto map itself

- crypto map MICHAEL_MAP 1 match address VPN_ALLOWED_ACCESS
- crypto map MICHAEL_MAP 1 set peer 91.45.23.34
- crypto map MICHAEL_MAP 1 set ikev1 transform-set MICHAEL
- crypto map MICHAEL_MAP 1 set security-association lifetime seconds 3600
- crypto map MICHAEL_MAP interface outside
That’s looking fairly good for the first configuration, now let’s jump over to the older IOS 8.2 and configure the VPN tunnel on there.
We are going to use the same steps, but you will notice the commands used are very slightly different.
First up we will create and enable ISAKMP again. Here is the first change, notice you now use crypto isakmp policy 10 instead of crypto ikev1 policy 10. (This is Phase 1)
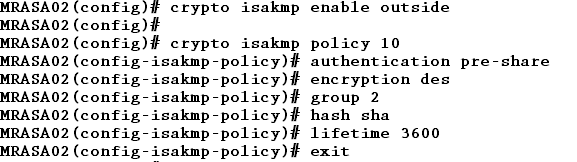
The eagle eyed amoungst you will have noticed the mistake I made. the lifetime (as defined on MRASA01) was 86400 not 3600, so lets go back and change that…

Now we will define the pre-shared key (again here’s another difference no tunnel groups, or group-policies, it’s a simple 1 line of text).

Moving on to Phase 2 now, we can now create our transform set again (again slight difference in code)

Let’s now create our access list and finally create our crypto map (as you can see if you try to assign a transform-set which doesn’t exist it won’t let you)

Lets create our access list once again

And that’s the lot!, we should now have a working VPN tunnel.
Lets switch over to Site A and try to ping across to Site B.
So Site A has an ip range of 192.168.10.0/24, and we will try to ping Site B 10.10.10.0/24
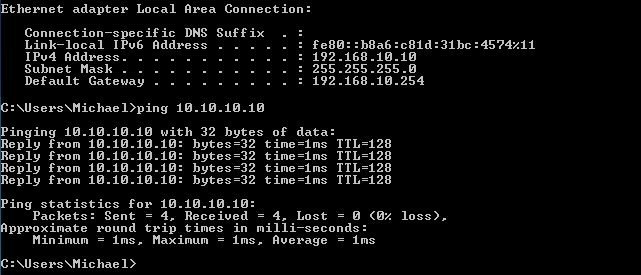
Success!, lets move over to Site B and try to ping back
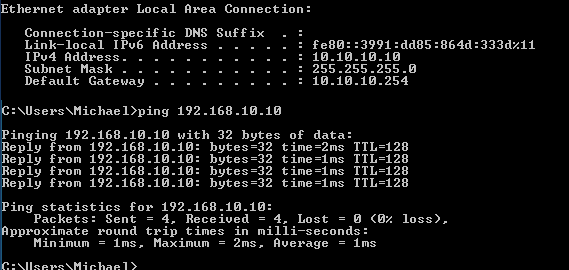
Again everything is looking good, so lets check what we see on MRASA01
If we run the below command, we can see detail of the current active tunnel
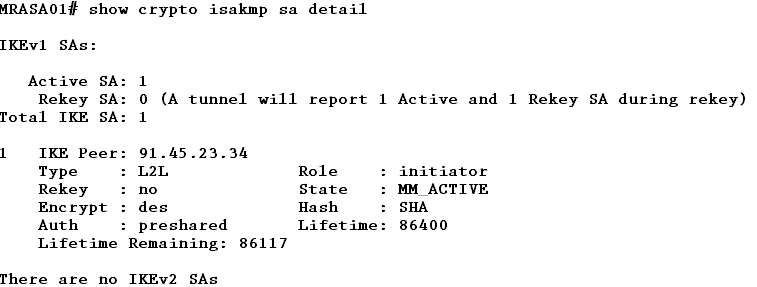
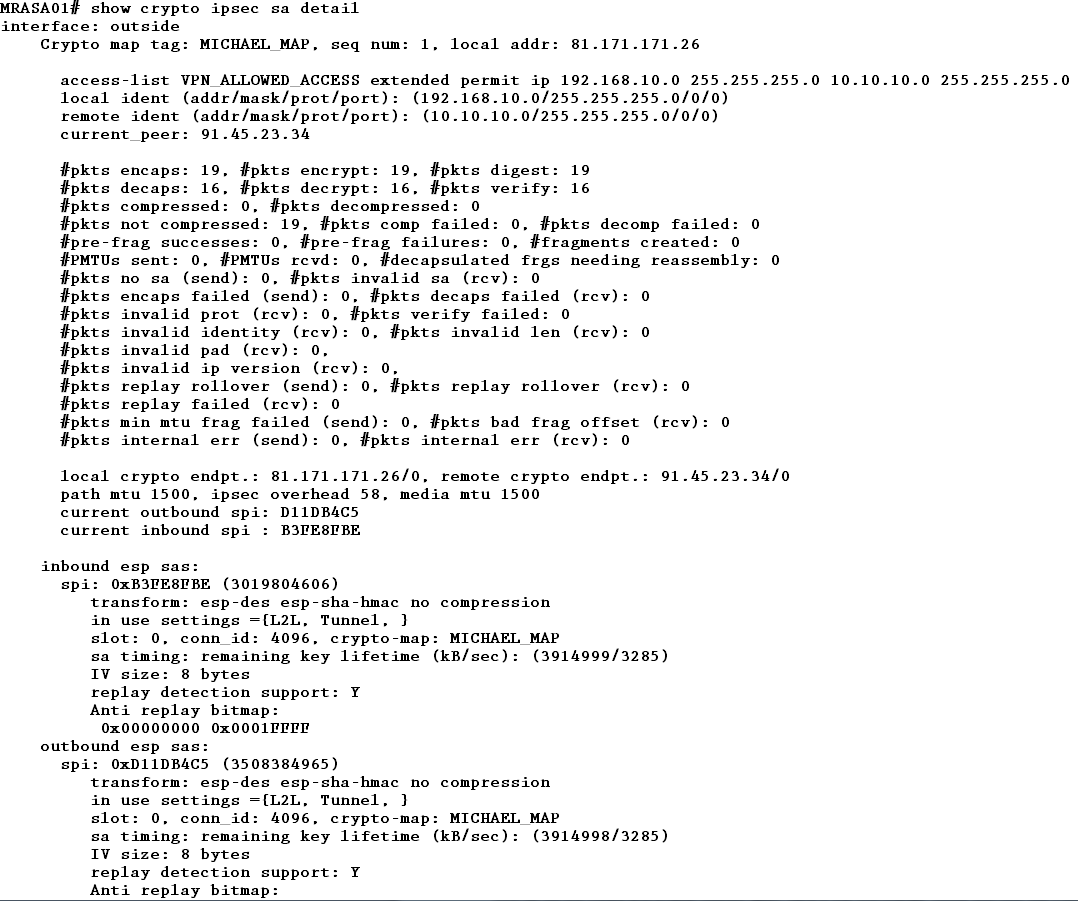
And if we want full details on the ipsec side of things, we can run the below command:
This gives us packet “movement”, as well as details on the WAN IP (local and remote), ACL in use, local and remote Subnets, which crypto map is in use etc..
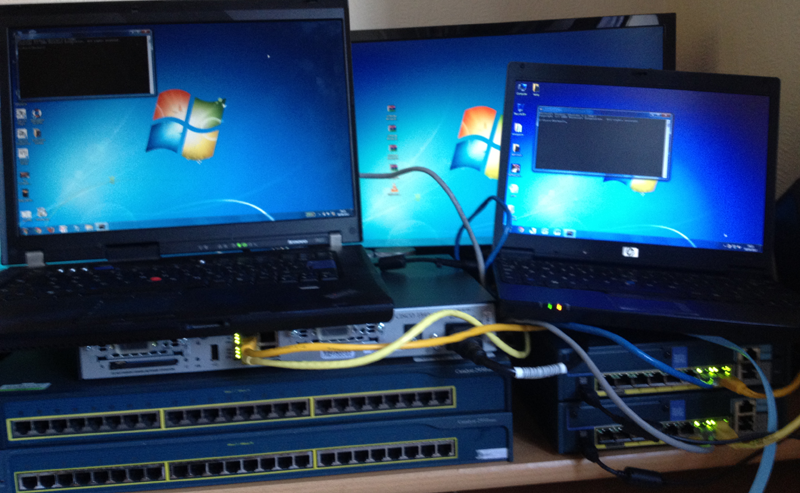
Well there we have it for another tutorial. Hopefully this will come in handy, and i’ll leave you with the “mess” that was my setup for this tutorial. (you can ignore the two 2950’s they weren’t in use)

I want to show my affection for your kind-heartedness for folks who must have guidance on in this subject. Your special dedication to getting the message up and down came to be remarkably good and have surely empowered others like me to reach their endeavors. Your own useful help denotes much a person like me and somewhat more to my peers. Warm regards;
This is positively helpful and it has helped me out loads. Good job.
Supreme Post, Thanks 4 sharing!
just the info I was looking for. Thank you
thanks for sharing the info
fantastic, you’ve gained a new reader 🙂
Very interesting details , appreciate it for the post.
I like the helpful information you provide in your articles. I will bookmark your weblog and check again here regularly. I am quite sure I will learn lots of new stuff right here! Good luck for the next!
Thank you for another great article.
I’m extremely inspired together with your writing talents and also with the format in your blog. Is this a paid topic or did you customize it your self? Anyway keep up the nice quality writing, it’s hard to find nice blog’s like this one nowadays..
Excellent post
I wanted to post you one very small note just to say thanks over again with your fantastic techniques you’ve provided in this case. It is simply wonderfully open-handed of you to offer without restraint precisely what a lot of folks might have offered for an e book to help make some dough for their own end.
You are great
you saved my day man thanks in a million